Flutter Column에 대해서 알아보자
UI 작업을 해보았다면 알수 있겠지만
나의 경우는 화면에 UI를 그려줄때에 겹쳐그리기인 경우를 제외하고는
가장 많이 그리는 방식이 가로로 차례대로 그리기 세로로 차례대로 그리기 이다.
이는 쓸때없이 UI depth를 만들기도 하지만 균형있게 화면에 widget을 배치하는데 효율적이다.
Column
flutter에서 세로 배치로 쓰이는 Column을 이용하여 Text Widget을 그려보면 다음과 같이 그릴 수 있다.
(상단의 Column이라는 Text의 Widget은 appBar이다.)

아래 내용을 그대로 flutter 프로젝트에 복사해서 실행해보면 위와 같은 그림이 나온다.
import 'package:flutter/material.dart';

void main() {
  runApp(const MyApp());
}

class MyApp extends StatelessWidget {
  const MyApp({Key? key}) : super(key: key);

  // This widget is the root of your application.
  @override
  Widget build(BuildContext context) {
    return MaterialApp(
      title: 'Flutter Demo',
      theme: ThemeData(
        primarySwatch: Colors.blue,
      ),
      home: const Main(),
    );
  }
}

class Main extends StatelessWidget {
  const Main({Key? key}) : super(key: key);

  @override
  Widget build(BuildContext context) {
    return Scaffold(
      appBar: AppBar(title: Text('Column'),),
      body: SafeArea(
          child: Column(children: const <Widget>[
            Text(
              'one',
              style: TextStyle(backgroundColor: Colors.red),
            ),
            Text(
              'two',
              style: TextStyle(backgroundColor: Colors.green),
            ),
            Text(
              'three',
              style: TextStyle(backgroundColor: Colors.yellow),
            ),
      ])),
    );
  }
}
Column의 정렬
Column에서 자주 사용하는 속성을 보자면 정렬에 사용하는 속성 두가지가 있는데
mainAxisAlignment : 메인축의 정렬 (세로)
crossAxisAlignment : 메인축의 수직축으로 정렬 (가로)
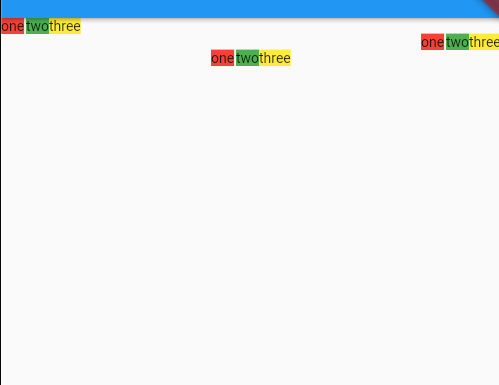
그중에서도 main 의 경우는 다음 값으로 정렬 할 수 있다.
start, end, center,
spaceBetween, spaceAround, spaceEvenly,
그중
start, end, center
를 적용한 경우는 다음과 같다. 순서 대로 start, end, center 이다.

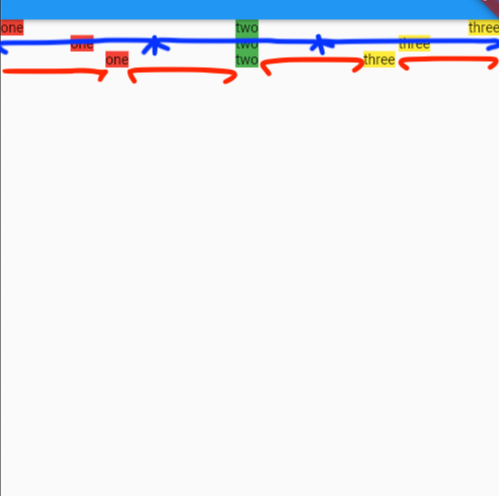
spaceBetween, spaceAround, spaceEvenly의 경우는 아래 보이는 그림과 같다.
차이를 확인 할 수 있는가?
spaceBetween - 각 위젯과의 간격이 같게 정렬 (빈공간의 크기가 같음)
spaceAround - 위젯을 중심으로 둘러싼 공간의 크기가 위젯별로 같음
spaceEvenly - 마지막 위젯의 상,하단 공간을 포함하여 각 공간의 크기가 같게 정렬
이미지를 자세히 보면 이해하기 쉬울 것이다.

Row
Row의 경우는 행으로 순차적으로 배치 하는 UI이기 때문에 Column을 Row로 바꾸면 바로 확인 할 수 있다.

Row의 경우는 행 배열이기때문에
mainAxisAlignment가 Column과는 반대로 가로 축이 된다.
crossAxisAlignment의 경우는 세로축이 된다.
Column과 같이
mainAxisAlignment의 속성값은 다음과 같다.
start, end, center,
spaceBetween, spaceAround, spaceEvenly,
Column의 세로축 기준으로 값이 Row에 맞가 가로축으로 바뀐것을 확인 할 수 있다.
순서대로 start, end, center, 속성값을 가진다.

Row의 spaceBetween, spaceAround, spaceEvenly 순서대로 표현한 widget 이다.

Tip...
Column도 Row도
crossAxisAlignment의 경우는 적용된 값을 확인할때 주의 해야 한다.
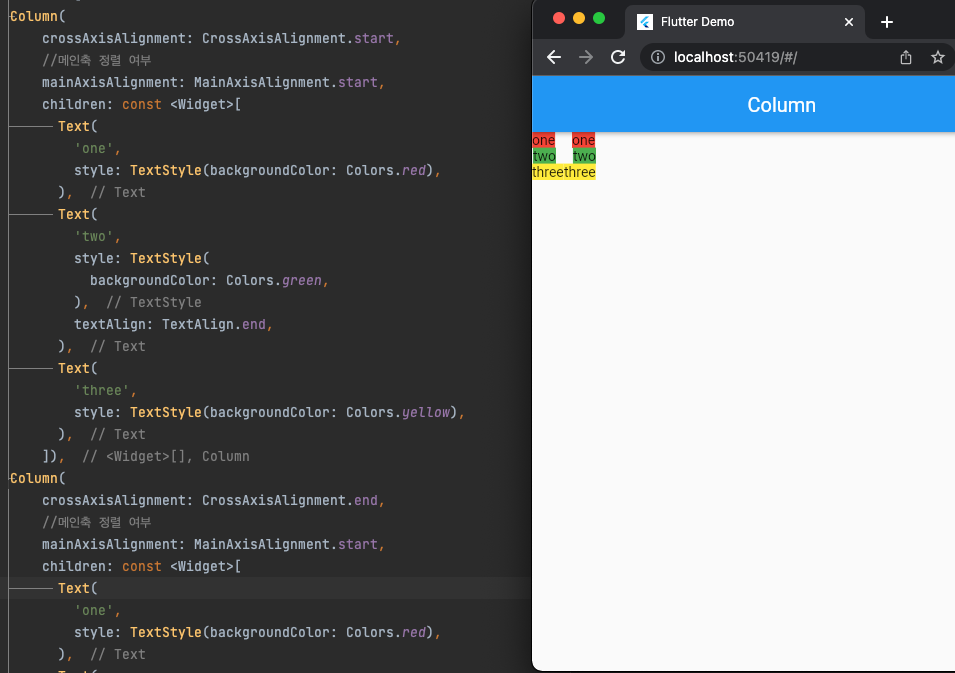
아래의 이미지와 같이 crossAxisAlignment 가 start, end로 설정되어 있지만 화면에는 변화내용이 없다.
이는 Column이 움직일 수 있는 운신폭이 없기때문에 화면에서 확인 할 수 없는 것이다.

각 Column을 Expended로 감싼 다음에 flex 값으로 각각 1씩주어서 비율로 Column두개가 화면의 반반씩의 영역을 차지하게 되면
crossAxisAlignment 속성값이 다음과 같이 적용된다.

마지막 Widget을 표현한 소스는 다음과 같다.
flutter 프로젝트에 아래 소스를 복사해 넣고 값을 바꿔 가면서 Column, Row와 mainAxisAlignment, crossAxisAlignment 의 값을 확인 하기 바란다.
class Main extends StatelessWidget {
  const Main({Key? key}) : super(key: key);

  @override
  Widget build(BuildContext context) {
    return Scaffold(
      appBar: AppBar(
        title: const Text('Column'),
      ),
      body: SafeArea(
          child: Row(
        children: [
          Expanded(
            flex: 1,
            child: Column(
                crossAxisAlignment: CrossAxisAlignment.start,
                //메인축 정렬 여부
                mainAxisAlignment: MainAxisAlignment.start,
                children: const <Widget>[
                  Text(
                    'one',
                    style: TextStyle(backgroundColor: Colors.red),
                  ),
                  Text(
                    'two',
                    style: TextStyle(
                      backgroundColor: Colors.green,
                    ),
                    textAlign: TextAlign.end,
                  ),
                  Text(
                    'three',
                    style: TextStyle(backgroundColor: Colors.yellow),
                  ),
                ]),
          ),
          Expanded(
            flex: 1,
            child: Column(
                crossAxisAlignment: CrossAxisAlignment.end,
                //메인축 정렬 여부
                mainAxisAlignment: MainAxisAlignment.start,
                children: const <Widget>[
                  Text(
                    'one',
                    style: TextStyle(backgroundColor: Colors.red),
                  ),
                  Text(
                    'two',
                    style: TextStyle(
                      backgroundColor: Colors.green,
                    ),
                    textAlign: TextAlign.end,
                  ),
                  Text(
                    'three',
                    style: TextStyle(backgroundColor: Colors.yellow),
                  ),
                ]),
          ),
        ],
      )),
    );
  }
}
stretch
이외에도 crossAxisAlignment 에는 stretch와 baseline이 있다. 그중 아래에서 확인 할 수 있는 속성값은 stretch이다.
두번째 Text의 위치가 오른쪽인 이유는 stretch를 통해 화면 전체로 Column의 폭을 늘리고 Text의 TextAlign값을 end로 설정하였기 때문이다.

위 내용은 아래 소스를 실행 한 결과 이다.
Expanded(
  flex: 1,
  child: Column(
      crossAxisAlignment: CrossAxisAlignment.stretch,
      //메인축 정렬 여부
      mainAxisAlignment: MainAxisAlignment.start,
      children: const <Widget>[
        Text(
          'one',
          style: TextStyle(backgroundColor: Colors.red),
        ),
        Text(
          'two',
          style: TextStyle(
            backgroundColor: Colors.green,
          ),
          textAlign: TextAlign.end,
        ),
        Text(
          'three',
          style: TextStyle(backgroundColor: Colors.yellow),
        ),
      ]),
),
baseline
baseline의 경우는 나열된 text의 baseline을 정렬하기 위한 속성값으로 다음 화면을 보면 이해하기 쉽다.
baseline을 적용한 경우 이다.

baseline을 적용하지 않은 경우이다. 어떤가? 확실한 차이를 알수 있는가??
baseline은 글자 크기가 달라짐으로 인해서 text baseline이 맞지 않는 부분을 맞춰 주는 속성이다.
대신 textBaseline이라는 속성의 값을 더 입력해야 한다. 그러지 않으면 오류를 마주하게 된다.

baseline을 테스트 해 볼수 있는 소스는 아래를 참고 하면 된다.
Expanded(
  flex: 1,
  child: Row(
      //수직축 관련 속성
      crossAxisAlignment: CrossAxisAlignment.baseline,
      textBaseline: TextBaseline.alphabetic,

      //메인축 정렬 여부
      mainAxisAlignment: MainAxisAlignment.start,
      children: const <Widget>[
        Text(
          'one',
          style: TextStyle(backgroundColor: Colors.red, fontSize: 40,),
        ),
        Text(
          'two',
          style: TextStyle(
            backgroundColor: Colors.green,
             fontSize: 80,),
          textAlign: TextAlign.end,
        ),
        Text(
          'three',
          style: TextStyle(backgroundColor: Colors.yellow, fontSize: 20,),
        ),
      ]),
),
마치며...
UI작업을 하면서 가장 많이 마주하게 될 Column과 Row에 대해서 알아보았다.
정렬과 속성값들을 통해 원하는대로 UI를 그릴수 있도록 연습해 두도록 하자.
'개발 > Flutter' 카테고리의 다른 글
| Flutter Stack (0) | 2022.04.21 |
|---|---|
| Flutter error - crossAxisAlignment != CrossAxisAlignment.baseline || textBaseline != null"textBaseline is required if you specify the crossAxisAlignment with CrossAxisAlignment.baseline" (0) | 2022.04.20 |
| Flutter Text Widget (0) | 2022.04.18 |
| Flutter 화면 이동 (0) | 2022.04.18 |
| Flutter ListView (0) | 2022.04.08 |


