반응형
Flutter Stack은 Widget을 겹쳐 놓을 수 있게 해주는 Widget 이다.
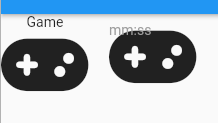
우선 다음 이미지를 먼저 보자
왼쪽은 Column으로 Text와 Icon을 넣은 경우이고 오른쪽은 Stack에 Text와 Icon을 넣은 경우이다.

Stack의 경우는 포토샵의 레이어 처럼 여러 위젯을 겹쳐 놓을 수 있다.
아래는 위 이미지의 소스 이다. Icon은 font_awesome_flutter package를 이용했다.
기본 Icon을 이용해서 테스트 해봐도 된다.
import 'package:flutter/material.dart';
import 'package:font_awesome_flutter/font_awesome_flutter.dart';

void main() {
  runApp(const MyApp());
}

class MyApp extends StatelessWidget {
  const MyApp({Key? key}) : super(key: key);

  // This widget is the root of your application.
  @override
  Widget build(BuildContext context) {
    return MaterialApp(
      title: 'Flutter Demo',
      theme: ThemeData(
        primarySwatch: Colors.blue,
      ),
      home: const Main(),
    );
  }
}

class Main extends StatelessWidget {
  const Main({Key? key}) : super(key: key);

  @override
  Widget build(BuildContext context) {
    return Scaffold(
        appBar: AppBar(
          title: const Text('Stack'),
        ),
        body: SafeArea(
          child: Row(
            mainAxisSize: MainAxisSize.min,
            children: [
              Column(
                mainAxisSize: MainAxisSize.min,
                verticalDirection: VerticalDirection.up,
                // <-- reverse direction
                children: const [
                  FaIcon(
                    FontAwesomeIcons.gamepad,
                    size: 70,
                  ),
                  // <-- first child
                  Text('Game'),
                ],
              ),
              SizedBox(
                width: 20,
              ),
              Stack(
                children: const [
                  FaIcon(
                    FontAwesomeIcons.gamepad,
                    size: 70,
                  ),
                  Text(
                    'mm:ss',
                    style: TextStyle(color: Colors.grey),
                  ),
                ],
              ),
            ],
          ),
        ));
  }
}
마치면서...
Column, Row에 이어 Stack까지 확인 해봤다.
이제 여러분이 원하는 대로 어느 정도까지는 그릴 수 있다!!!
반응형


